Lesson 4 is up on my YouTube Channel! Learn how to make an easy chalkboard inspired photo mat as a centerpiece to your scrapbook page! Embellish further with a spinner which I've created and included as a FREE printable below!
I would love to see if you create something with these ideas so please link it in the comments below to share!
Pride by Maureen Esquillo-KaoSupplies
Cardstock: Recollections; Patterned
Paper: Cosmo Cricket, Pinecone Press;
Alphabet Stickers: Heidi Swapp; Spinner:
Cosmo Cricket; Punches: Marvy Uchida;
Label Maker: Dymo; Other: Book page
Thanks for visiting!
Spinner (included below):
This is an
optional embellishment for your layout. Print in color on 8.5”x11” white cardstock, presentation paper
or photo paper. Cut out the square and the arrow. Pierce a hole or punch a hole
through the middle of the arrow and secure it to the spinner with a brad.
Another
option would be to glue down the arrow onto the spinner and add a button (or
other circle embellishment) to the middle of the arrow.
Lesson 1: Using Circles to Create a Filmstrip and Dimensional Flower
Supplies:
Alphabet stickers (for title)
Chipboard button and ribbon/twine (or something else to use for a flower center)
Circles punches: 1”, 1.5”, 2.75” (use similar sized punches or use circle templates
Crop-A-Dile which has a 3/16” punch OR standard size hole punch - 0.25”
Filmstrip templates (provided for this class)
Glue stick (recommended) or other adhesive
Hot glue gun (or very strong glue)
Journaling pen
Patterned paper
Pen or pencil
Printer (If you don’t have one, I’ll show you how to create a filmstrip without a printer.)
Ribbon, trim or twine
Scrap paper
Solid card stock in carious colors
If not using filmstrip template (ie: no printer), you will need black cardstock, white
card stock and a standard sized hole punch (see “alternative filmstrip” tutorial)
Step One: Print out the filmstrip template on 8.5” x 11” white card stock. If NOT using template (you don’t have a printer), refer to the “Alternative Filmstrip” tutorial. Cut out both filmstrips. If needed, cut your photos down to size so that they fit inside the filmstrip. (There will be slight measurement variations depending on your printer so measure the height of the white strip to determine the measurement for your photo’s height to be able to fit inside the filmstrip.) You can leave the filmstrip holes alone or punch them out with either a standard sized hole punch or a Crop-A-Dile. Use the proper filmstrip template that corresponds to the hole punch you are using.
To put together a continuous filmstrip measuring 12” across, you will glue the two pieces so that they overlap in the middle. Add glue to the areas of the two filmstrip pieces that overlap to create a long filmstrip piece. Make sure the holes match up when they overlap. Also, the filmstrip should be slightly longer than 12” (if you’ve punched holes in your filmstrip). You will cut off the excess later. Glue your photos to the strip. Set aside your filmstrip.
Step Two: This step is optional if using a doily. You could also cut out the large circle on one of the templates provided in substitution. Mist your doily with yellow mist (or any mist that coordinates with your layout). Allow to dry or use a heating tool to dry the doily. Once dry, cut it down the middle.
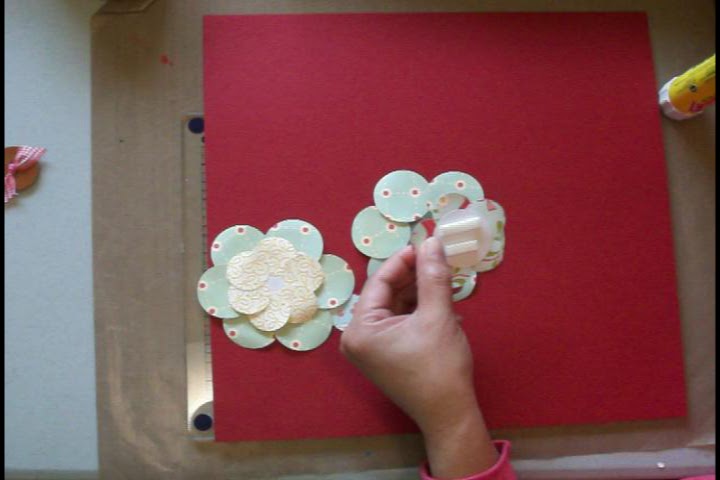
Step Three: To create the dimensional flower, use the 2.75” punch to punch a circle from scrap cardstock. Take a 1.5” punch and punch out six circles from patterned or solid cardstock for use as flower petals. Take a 1.5” circle and place the pen/pencil in the middle. Fold the ends upward so that the circle folds into a taco. This will create a dip in the middle of your circle. Next, position your pen so that it runs perpendicular to the middle fold you just made. Curl the edge of the circle over the pen/pencil and curl the edge under. These steps will add texture to your flower petals. Do this for all six 1.5” circles.
Step Four: Add glue to the middle of the 2.75” circle. Take the 1.5” circles and glue them on the outside edges of the large circle. Make sure the curled edges are positioned outward before gluing them down onto the large circle. Glue the 1.5” all around the large 2.75” circle so that it looks like flower petals. Flip the flower over to assist your in repositioning the petals evenly. Use firm pressure with your fingers to slide the petals so that they are evenly spaced around the large circle. Once you’re happy with the placement of the petals. Press down firmly on the middle of the flower. Set aside.
Step Five: Punch a 1.5” circle from scrap paper. Punch out six 1” circles to use as petals. Add glue to the middle of the 1.5” circle. Add texture to the 1” flower petals with a pen/pencil as explained in Step Four. Glue the flower petals to the 1.5” circle. Re-position petals if needed.
Step Six: Glue the smaller flower to the larger flower you created in Step Four. For added dimension, use adhesive foam. Press firmly around the flower so that all layers are secure. Add a flower center to your dimensional flower. I used a chipboard button and tied a ribbon in the middle of it to create one. If you do not have a pre-made chipboard button, follow instructions below.
To create a faux button/flower center: Punch a 1” circle from some coordinating card stock. Punch two smaller holes in the center with either a standard sized hole punch or a Crop-A-Dile. Tie some twine or ribbon through the holes. Add to the center of the flower you just created.
Step Seven: Position the doily pieces as shown in the sketch. Glue them down. Glue down the filmstrip and your photos and trim the overhanging edge if you have one. Glue on the dimensional flower to the top left hand corner of the layout.
All Aboard by Maureen Esquillo-Kao Supplies Cardstock: Recollections; Patterned Paper: Cosmo Cricket; Alphabet Stickers: American Crafts, Jenni Bowlin; Journaling Sticker: Jenni Bowlin; Mist: Maya Road; Circle Punches: EK Success, Fiskars; Other: Chipboard button, ribbon, doily, bingo piece, vellum; Filmstrip Template created by Maureen Esquillo-Kao
Step Eight: Add your title to the top left hand corner, next to the flower. Add journaling to the bottom right hand corner of your layout. You may have a place to journal on in the center of the doily. Add a journaling sticker if more journaling space is needed. Embellish your layout further if you desire. Now it’s complete!
To create a filmstrip photo mat, here's a tutorial:
HERE'S A FREE PRINTABLE TEMPLATE TOO
Enjoy, and thanks for watching!
Along with a busy Holiday season, I've got two kid birthdays also going on every year. This year we decided to do a double birthday celebrations for the kiddos.
But I also wanted to do some fun home décor as well. I wanted to use supplies I already had in my craft room or that are easy to locate in your local craft store.
I had a 16" x 20" canvas along with a frame laying around! I decided on a framed chalkboard. All I had to do was paint the large canvas! I completed this project in a span of 3 hours. (Tip: If you don't have a spare 3 hours laying around, speed up the drying process by using a hairdryer between coats of paint! Yes! Dust off your hair dryer and finally put it to use!)
Here are the easy steps:
Step 1: Gather your supplies and cover your working surface with a few layers of newspaper. In case of a spill, it's best to have more than one layer so that paint won't happen to soak through onto your work surface. I've used a 16x20 canvas but you could also paint a piece of cardboard as well. Anything stiff and sturdy that you could frame. You'll also need gloves, black chalkboard paint (I used some by Plaid), and a sponge brush. Sponge brushes will not leave the brush/bristle texture behind as you paint.
Step 2: For minimal clean up, I like to use a old piece of paper, wax paper, foil, or even pieces of cereal boxes. Use what you have laying around. Use this as your paint palette and when you're done you can just throw it away in the trash. Here I've used a piece of wax paper.
Step 3: Paint on your first coat of chalkboard paint and be sure to cover the edges of the canvas. In the future you can choose to hang it without the frame and the edges will look nice and finished. Let dry 30 minutes to an hour between coats and paint on about 3 coats for a nice even finish. Let dry for 24 hours.
Step 4: Once you're done, you can prep/prime your chalkboard surface by taking a piece of chalk and rubbing it over the entire front surface of your canvas. This will insure that when you draw/write on it for the first time, the images won't show up after your erase it later.
Now your chalkboard canvas is ready for some nice artwork!
The first event I am hosting is a birthday party. Since I decided on using a chalkboard marker, I didn't prep the surface of the chalkboard canvas. I wanted the artwork to have a greater contrast between black and white. I tested the surface to see if the marker would fully erase but it left behind a bit of a white cast/shadow. My plan is to paint another couple coats of chalkboard paint after the birthday party to get my canvas ready for Thanksgiving and Christmas just in c)se the design will not erase completely. I plan to try rubbing alcohol to see if it will help take the white cast completely away. (I'll let you know if that works out.)
Because I have no experience with chalkboard art, I turned to Pinterest for some ideas. There are tons of images to help you find pictures and fonts to use. I simply searched "Happy Birthday chalkboard art" and had many pins to choose from. I really liked this post from In My Own Style. I found that the photo was easy for me to replicate. Search the photos until you find inspiration that speaks to you and that you could easily re-create in your own style. THAT is the key. Chalkboard art is imperfect, smudged, nostalgic and cozy! Don't over think it or stress over perfection. Just create and have fun!
Here are some pretty cool blog posts about chalkboard art/lettering I came across (or search chalkboard art DIY on Pinterest):
Here's my finished project! I purchased this frame with glass and a print inside on sale with my Michael's 40 % off coupon. I ditched the glass and print and popped the canvas in. Secure with duct tape on the back. This frame was made to lean up against a wall and not be hung on a wall. If you do plan on hanging the artwork, I'd purchase a canvas panel and not a stapled canvas.
Hope you enjoyed this post! Let me know if you were able to come up with something based on this post! I'd love to see it!